Diverse Tips & Tricks

This post will show you several simple tricks about how to do certain things with Sparrow. I hope that it contains some interesting facts for anyone!
Flipping an image
Sometimes, you need to flip an image horizontally or vertically. Sparrow’s display objects do not contain a property
that allow you to do so directly. However, it’s easy to do so with the scaleX and scaleY properties. You just have to use negative values!
Here’s how to do it:
SPImage *image = [SPImage imageWithContentsOfFile:@"image.png"];
image.scaleX = -1; // flip horizontally
[self addChild:image];
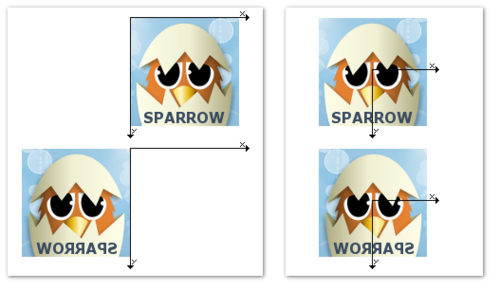
The downside is that the bounds of the image move to the left with that approach. Think of the pin-analogy I used in an Introduction to Sparrow: the pin is where the image is attached to its parent. In an unscaled image, the pin goes through the top left corner. When you change the scale factor, the pin does not move - but the rest of the image does, reflecting the scale factor. (See image below, left side.)
To rectify this, you can simply move the image to the right by its width:
image.x += image.width;Or you can add the image to a container as shown here and flip the container instead. The pin is now at the center of the image - thus, the bounds stay the same. (See image below, right side.)
// center image in container
SPImage *image = [SPImage imageWithContentsOfFile:@"image.png"];
SPSprite *sprite = [SPSprite sprite];
image.x = image.width / -2.0f;
image.y = image.height / -2.0f;
[sprite addChild:image];

// now flip container instead
sprite.scaleX = -1;
[self addChild:container];
Code snippet: Getting the current framerate
You can ask Sparrow which framerate it tries to achieve at the moment with this line:
float frameRate = self.stage.frameRate;However, this won’t tell you what the real framerate is. If there are a lot of objects on the screen or your game logic needs a lot of CPU power, the device won’t be able to render as many frames per second as you requested.
To find out the actual frame rate, you can use the following code snippet. Just add it to an enter frame event handler:
- (void)onEnterFrame:(SPEnterFrameEvent *)event
{
    static int frameCount = 0;
    static double totalTime = 0;
    totalTime += event.passedTime;
    if (++frameCount % 60 == 0)
    {
        NSLog(@"fps: %.2f", frameCount / totalTime);
        frameCount = totalTime = 0;
    }
}
This will display the actual frames per second to the console.
Framerate Peculiarities
Speaking about framerates: Sparrow will only use framerates that are divisors of 60. That’s because the iOS device’s screens have a refresh rate of 60 Hz. In other words, only framerates like the following are supported:
60, 30, 20, 15, 12, 10, ...So if you set your framerate to, say, 40, Sparrow will show not more than 30 fps.
Tinting images
Have you ever wondered why Sparrow’s SPImage class contains a color-property? Well, you can use that property to tint a texture in any color!
While this can be used for different things, e.g. highlighting items of interest, I want to show you an especially useful way to save texture memory.
Let’s say you have a “SameGame”- or “Tetris”-style game with lots of blocks with different colors. Thanks to the color-property of SPImage, you only need to create one white image of such a block. To display the actual block on the screen, you just need to set its color.
SPTexture *blockTexture = [SPTexture textureWithContentsOfFile:
                           @"block.png"];

SPImage *redBlock = [SPImage imageWithTexture:blockTexture];
redBlock.color = 0xff0000;

SPImage *greenBlock = [SPImage imageWithTexture:blockTexture];
greenBlock.color = 0x00ff00;

// etc.!
The output color is the result of a multiplication of the color of a pixel in the texture by the color of the quad. That means that you can never use the color-property to make a texture look brighter, but only darker. (That’s because both sides of the multiplication have values between 0 and 1. To make a color brighter, you would have to multiply it with a value bigger than 1!)

Creating color gradients
Actually, the color-property of SPImage is declared by its base-class, SPQuad. A quad is just a rectangle with a color (but without a texture). And if you look at the interface of SPQuad, you’ll see that you can not only set one color, but four of them: one per vertex. This is a very simple and efficient way to create color gradients.
Do you remember the colorful sky background in PenguFlip? It was created with 5 huge quads, each with one color gradient. Here’s how one of those quads was created:
uint bottomColor = 0x1c1191; // blue
uint topColor = 0xea0b0b; // red

SPQuad *quad = [SPQuad quadWithWidth:250 height:150];
[quad setColor:topColor    ofVertex:0];
[quad setColor:topColor    ofVertex:1];
[quad setColor:bottomColor ofVertex:2];
[quad setColor:bottomColor ofVertex:3];
The vertices 0 and 1 are at the top, while 2 and 3 are at the bottom. Naturally, you can use 4 different colors for the 4 vertices, if you want to.

Iterating over children
Display object containers (like SPSprite) can have numerous children. It’s a common mission to do something with all of those children. This is, of course, done with a loop. Most of you will already have used a code like the following:
for (int i=0; i<container.numChildren; ++i)
{
  SPDisplayObject *child = [container childAtIndex:i];
  [child doSomething];
}
However, there’s another way to do it. The nice thing about that alternative is that it’s not only less code to write, but it’s also more efficient, and will thus save your CPU some work. Here’s how to do it:
for (SPDisplayObject *child in container)
  [child doSomething];
Not too bad, isn’t it?