Introducing Starling Builder
It’s been a while since we had a guest post on our blog! But when Johann Huang from SGN told me about the project he was working on, I knew we had to spread the word about this to as many developers as possible. Johann, thanks a lot for this amazing contribution!
I have been working on the Adobe Flash platform since 2010, from the dawn of Facebook gaming. At that time, we used Flash Professional to layout UI/map elements and to load the SWF directly into the game.
As mobile games and stage3d technology are getting more and more popular, we are excited to embrace Starling, the de facto 2D framework of stage3d for making games that can work not only on the web, but more importantly, also on iOS and Android devices.
When transitioning to Starling, everything went well, except for one drawback: Flash Professional only supports traditionally Flash. Thus, we had to change our workflow, and we came up with the following process:
- Edit textures and layouts in Photoshop
- Export textures and layouts using a JSX extension
- Create display objects based on textures and layouts
Yes, it works; but due to platform differences between Photoshop and Starling, most of the time we didn’t get the same look in Photoshop and the game. Every time we made a new UI, it took us many iterations to make it look as expected in the game, which is pretty boring and time consuming. That’s why we came up with the idea of creating the UI tool!
Since Starling Builder and the game share the same code of creating the UI, it’s guaranteed to look exactly the same. Furthermore, you can tweak the UI and see the result without compilation within the editor, which is much faster than the old workflow.
If you feel the same way as I do, then it’s time to move forward!
The new Workflow
- Export textures
- Create layouts in Starling Builder
- Put them into the game
Export textures
Starling Builder is not responsible for exporting textures, so you can use whatever workflow to do it. Just make sure to put them in the YOUR_WORKSPACE/textures folder. However, to help you with the whole process, there are two scripts in the tools folder inside the editor repository:
export_psd.jsxis a Photoshop extension script. Use it to export PNGs from a Photoshop document. Each layer will export to an individual png of its name.pack.pyis a Python script to call either TexturePacker or ShoeBox to pack the pngs into the atlases.
Again: the scripts have nothing to do with Starling Builder. Feel free to use whatever tools you are comfortable with.
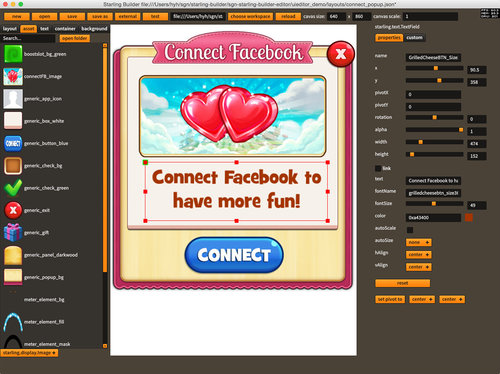
Create layouts
You can start to create your UI elements using Starling Builder when you have your textures ready to use. Layouts are saved in JSON format. You can save them anywhere on your computer.
Put them into the game
Copy the engine code into your game, as well as the texture and layout files. Inside your game, you can simply do something like this to create the display objects:
var data:Object = JSON.parse(new EmbeddedLayouts.mail_popup());
var sprite:Sprite = UIBuilderDemo.uiBuilder.create(data) as Sprite;
addChild(sprite);
The Starling Builder engine repository comes with a demo project, which you can check out for more details.
Features
Scale3/Scale9 Images
Editing Scale3/Scale9 regions by hand is sometimes a pain. Starling Builder provides a user interface for you to define scale3/scale9 region without hassle.

Component and property customization
All the properties of the components are customizable through a config file. Find it in YOUR_WORKSPACE/setting/editor_template.json, or simply click on “Workspace → Edit Template” to open it. You can add and edit properties or components by modifying the file.
Here’s an example of adding the blendMode property to Image:
{
    "cls":"starling.display.Image",
    "params":[
        {"name":"width", "component":"slider", "min":1, "max":2000, "step":1},
        {"name":"height", "component":"slider", "min":1, "max":2000, "step":1},
        {"name":"scaleX", "step":0.01, "default_value":1},
        {"name":"scaleY", "step":0.01, "default_value":1},
        {"name":"color", "component":"colorPicker", "default_value":16777215},
        {"name":"blendMode", "component":"pickerList", "options":["auto", "screen", "normal"], "default_value":"auto"}
    ],
    "constructorParams":
    [
        {"cls":"starling.textures.Texture"}
    ],
    "tag":"asset"
}
Custom Component Classes
Sometimes you need to map a generic class the editor can recognize to a game-dependent class only accessible in the game. To do that, go to the “custom” tab and edit the customComponentClass field. Just fill in the fully qualified class name and Starling Builder will do the mapping for you.
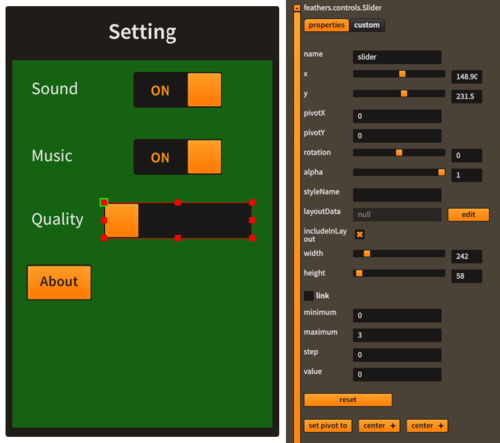
Feathers Themes
If you want to use a Feathers theme in the game, it’s possible to put it into the editor, too. However, it’s a little bit more complicated than just dropping the files.
Since Feathers UI isn’t designed to support two themes at the same time (the one from the editor and the one from the game), you need to change your theme to extend from UIEditorTheme (a workaround implementation to support two themes). Create an SWF from the theme build config and put the EmbeddedTheme.swf file inside the theme folder.
Localization
A very neat feature of Starling Builder is localization. In the editor, you can switch to different locales with a single click. There’s a default implementation that reads the the JSON text files with a simple data[key][locale] format. If you need to support your own format, you can implement ILocalization and replace the current one in both your game and the editor.

About Us
I’m Johann Huang from SGN. We are the fastest growing major U.S. mobile games studio, and have made popular social mobile games such as Cookie Jam, Panda Pop, Juice Jam, Sugar Smash: Book of Life, etc. Most of our games are powered by the Starling Framework and are universally available on iOS, Android and the web. We would like to contribute back to the community by making Starling Builder open source, hoping to increase the popularity of the Flash/Stage3d/Starling community.
For more information please visit the Starling Builder Wiki and our GitHub repository.